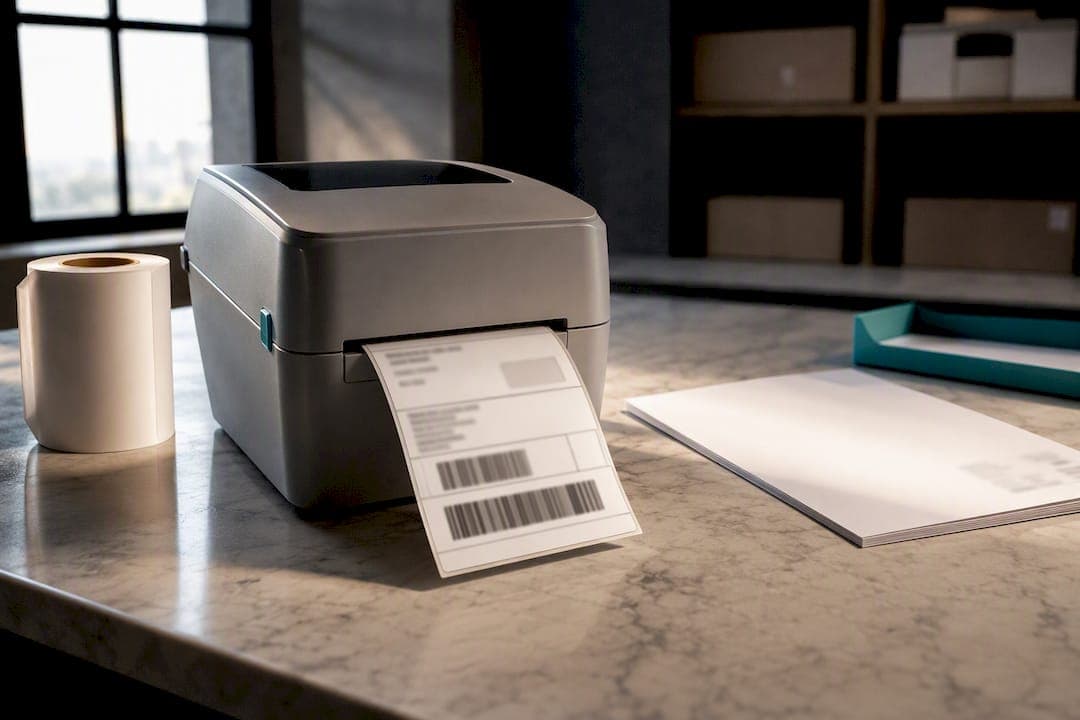
The standard shipping label size is generally 4 × 6 inches (about 100 × 150 mm), and it's commonly used by most thermal printers and carriers worldwide. The rule that matters more than the number, though, is scannability: keep the barcode flat, high contrast, and free of tape or creases. If you don't own a thermal printer, using an A4 or Letter-size PDF as a fallback often works for many carriers.
TL;DR:
- Carriers primarily prioritize barcode clarity and high contrast over exact label dimensions when accepting shipping labels.
- Using a thermal printer with 4×6 inch rolls is more durable and faster for high-volume shipping, while A4 or Letter sheets suit occasional shippers.
- Always print labels at actual size and ensure they are flat, high-quality, and correctly affixed to avoid scan failures that can delay delivery.
- International shipments often require larger labels like 4×8 inches or full sheets to accommodate customs documents without sacrificing scanability.
- Simplyparcel generates and matches the correct label size to your printer during checkout, simplifying the process and reducing size-related errors.
Table of Contents
- What Is the Standard Shipping Label Size? A Quick Reference
- Thermal Rolls vs A4/Letter Sheets: Which Printer Format Fits You?
- Do Carriers Require a Specific Shipping Label Size?
- How Do You Choose the Right Label Size for Your Package?
- Printing Checklist and Common Mistakes That Cause Scan Failures
- How Simplyparcel Handles Label Sizing for You
- Minimum and Maximum Label Sizes: What Different Carriers Accept
- Does Label Size Affect Your Shipping Cost?
- Why Label Size Matters for Tracking and Automation
- Tools and Templates for Creating Shipping Labels
- Our Take: The Real Skill Isn't Picking a Size, It's Matching One
- Sources
What Is the Standard Shipping Label Size? A Quick Reference
Once you know the standard is 4 × 6 inches (101.6 × 152.4 mm), the next question is when to deviate from it. Not every parcel needs the same label, and picking the wrong one wastes label stock or crowds out your barcode.
| Label Size | Metric Equivalent | Best For |
|---|---|---|
| 4 × 6 in | 101.6 × 152.4 mm | Standard parcels, thermal printers, most carrier defaults |
| 4 × 8 in or — | 101.6 × 203 mm or — | International shipments needing extra room for customs forms |
| 2 × 3 in / 2 × 4 in | — / 50.8 × 101.6 mm | Lightweight mailers, small product tags, jewelry or accessory parcels |
| A4 or Letter (full sheet) | — or 8.5 × 11 in | Inkjet/laser printers, one or two 4×6 labels per page |
| 4 × 6 in (pallet variant) or larger | Varies by warehouse system | Bulk freight, pallet identification, warehouse routing labels |
A few practical notes worth remembering:
- The taller 4×8 format exists mainly because international shipments often need extra space for customs paperwork printed directly below the shipping address.
- Smaller 2×3 and 2×4 labels suit envelopes and mailers where a full 4×6 label would swallow the package.
- Pallet and warehouse labels follow different conventions entirely, since they're scanned by fixed conveyor readers rather than handheld devices.
If you're shipping a single small parcel, the smaller formats save label stock without sacrificing legibility. Anything crossing a border usually does better on the larger end.
Thermal Rolls vs A4/Letter Sheets: Which Printer Format Fits You?
Your printer decides your label size before you even open a shipping platform. Direct thermal printers use 4×6 rolls or fanfold stacks. They print without ink cartridges, run fast, and hold up better against moisture and scuffing than inkjet output, which matters if your parcel sits in a delivery van for a few hours.
Inkjet and laser printers work off standard A4 or Letter sheets. You don't need new hardware, and most platforms let you print two 4×6 labels per page or a single label per page, which you then cut or peel from pre-scored sheets.
The trade-off comes down to volume:
- Occasional shipper (a few parcels a month): A4/Letter on your existing printer is cheaper and requires zero setup.
- Regular small business (dozens of parcels a week): A dedicated thermal printer usually pays for itself within a few months through faster printing and lower per-label cost.
- High-volume operation: Thermal is close to mandatory. Cutting individual labels from sheets becomes a real time drain at scale.
Pro Tip: If you're testing whether a thermal printer is worth the investment, track how many minutes you spend cutting and taping A4 labels over two weeks. That number usually settles the decision faster than any spec sheet.
Do Carriers Require a Specific Shipping Label Size?
No carrier enforces one rigid dimension across the board. What they actually check is whether the barcode scans cleanly and the address prints legibly, not whether your label measures exactly 4 by 6 inches to the millimeter. That's confirmed by label manufacturers who note that acceptance is driven by barcode readability and application, not a fixed legal dimension.
That said, formatting quirks exist and catch people off guard:
- Some carriers add blank margins or "doc tabs" around the label for handling purposes.
- Your shipping platform might return a 4×6 label embedded inside an 8.5×11 PDF rather than a standalone 4×6 file, which throws off printing if you're not expecting it.
- Requesting a PNG or a size-specific export, where the platform allows it, avoids the scaling issues that come with an embedded PDF.
The size that actually gets flagged during a scan failure has nothing to do with inches. It's a barcode that's been shrunk, blurred, or partially obscured. That's why the fix for most rejected labels isn't reprinting at a different size. It's checking whether "fit to page" scaling squeezed the barcode down when you hit print. Always select the label size option inside your shipping platform instead of letting your printer's default scaling decide for you.
How Do You Choose the Right Label Size for Your Package?
Start with the package itself, not the label. Measure the largest flat face and make sure a 4×6 label will sit there without wrapping around an edge or crossing a seam or piece of tape.
- Measure the largest flat surface on your box or mailer. If nothing fits a full 4×6 label, drop to a 2×4 rather than folding the label over a corner.
- Match label stock to your printer. Thermal printers need 4×6 roll stock; inkjet and laser printers need A4 or Letter sheets.
- Check whether you need extra space for paperwork. International shipments with customs forms often do better on a 4×8 or full A4 sheet, since a taller label leaves room for documentation without a separate pouch.
- Set your printer to 100% or "actual size." Never use "fit to page."
- Run a test print before committing your whole batch, then confirm the barcode reads cleanly.
- Affix the label to a flat, dry surface, away from seams and tape.
Pro Tip: Keep a ruler by your packing station. Eyeballing "close enough" on box dimensions is the single most common reason people order the wrong label size for a run of packages.
Printing Checklist and Common Mistakes That Cause Scan Failures
Most scan failures trace back to three habits, and all three are avoidable in under a minute of extra care.
- Print at actual size (100%). Scaling shrinks or stretches the barcode just enough to make it unreadable to a handheld scanner, even though it looks fine to your eye.
- Use quality label stock, and lean toward thermal for anything beyond a handful of shipments a week.
- Apply the label to a flat surface. Labels placed across box seams or under strips of tape crinkle the barcode just enough to break the scan, and that's true whether the label is 2×3 or 4×6.
- Never print a faint barcode. If your thermal printer's ribbon or heat setting is running low, the contrast drop alone can cause a failed scan.
Pro Tip: Before you drop off or schedule a pickup, scan your own label with any free barcode-reader app on your phone. It takes ten seconds and catches the problems a courier would otherwise flag at the counter.
Getting the placement right the first time also saves a reprint. Our guide to attaching a shipping label walks through exactly where to position it on odd-shaped boxes.
How Simplyparcel Handles Label Sizing for You
Simplyparcel generates carrier-ready labels in either 4×6 or A4/Letter format automatically once you book a shipment, so you're not guessing which size to select. The platform matches the output to your printer setup during checkout, which removes the trial-and-error most people go through on their first international shipment.
If you're printing and affixing a label from a Simplyparcel booking, the process runs in four quick steps:
- Confirm your printer type (thermal or inkjet/laser) when prompted at checkout.
- Download the generated label in the matching format.
- Print at actual size, never at "fit to page."
- Affix to the largest flat face of your parcel, clear of seams and tape.
For a full walkthrough with screenshots, our step-by-step printing guide covers every screen in the booking flow.
Minimum and Maximum Label Sizes: What Different Carriers Accept
Carriers rarely publish a strict minimum or maximum in the way you'd expect from a legal spec. Instead, most set a practical floor around 2×3 inches, below which barcodes lose the "quiet zone" (the blank margin around a barcode that scanners need to lock onto it) and start failing scans. On the upper end, 4×6 remains the ceiling for standard parcel service across most couriers, with 4×8 or A4 reserved for shipments carrying customs documentation.
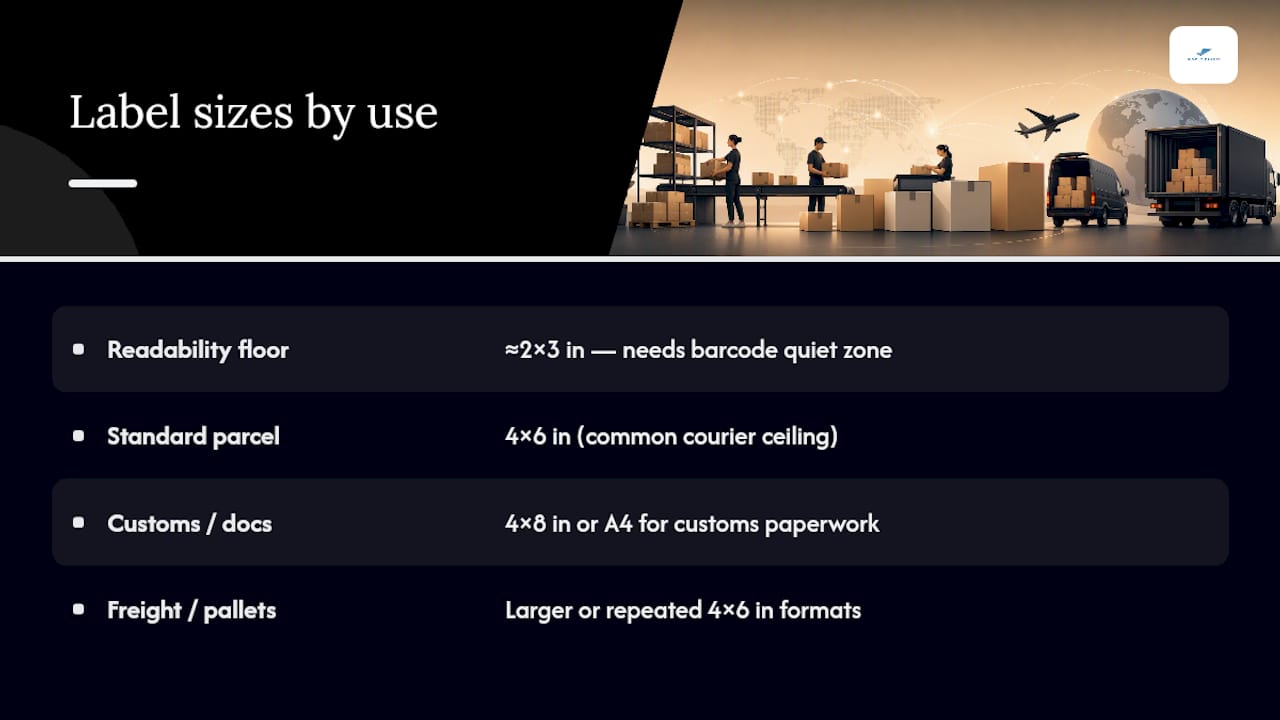
Where carriers differ is in how flexible they are about accepting variants. Some will process a label as long as the barcode and address block meet their minimum readable size, regardless of the surrounding label dimensions. Others are stricter about matching their own template, particularly for automated sorting facilities that rely on fixed-position scanners rather than handheld ones.
Freight and pallet shipments follow a separate set of rules entirely, often requiring larger formats (sometimes 4×6 inches repeated multiple times on a single sheet, or oversized 6×4 inch variants) designed for warehouse conveyor scanning rather than manual handling. If you're shipping bulk freight rather than individual parcels, check your specific carrier's freight documentation before assuming your standard 4×6 desktop printer setup will work.
The safest approach if you're unsure: use whatever size your booking platform generates by default. That output is already built to match the carrier's expected format, which removes most of the guesswork around minimums and maximums entirely.
Does Label Size Affect Your Shipping Cost?
Label size itself doesn't change what you pay. Carriers price shipments by weight, dimensions of the package, and destination, not by whether your label measures 4×6 or fits on an A4 sheet. Where size indirectly affects cost is through what the label enables you to communicate clearly.
A cramped label that omits key details, or one where the barcode fails to scan, can trigger manual handling fees or delays at a sorting facility. That's an indirect cost tied to label quality, not label size on its own. Similarly, if you choose a taller 4×8 format because your shipment needs customs paperwork attached directly to the parcel, you're not paying more for the larger label. You're avoiding a potential customs delay that would cost you far more in transit time.
Where size does matter is in your choice of shipping speed and service tier. Priority services and expedited options often rely more heavily on automated sorting, which makes a clean, correctly sized, high-contrast label more important than it would be for a slower economy service handled with more manual sorting steps. A blurry or miniaturized barcode is more likely to cause a hiccup on a fast automated line than on a slower manual one.
The practical takeaway: don't oversize or undersize your label to try to save money. It won't. Size your label to the package and printer you actually have, and let weight and dimensions do the work of determining your rate through your booking platform.
Why Label Size Matters for Tracking and Automation
Every tracking number lives inside that barcode on your label, and every scan along the delivery chain, from drop-off to the delivery truck, depends on a machine reading that code cleanly. A folded, creased, or scaled-down label puts every one of those scans at risk.
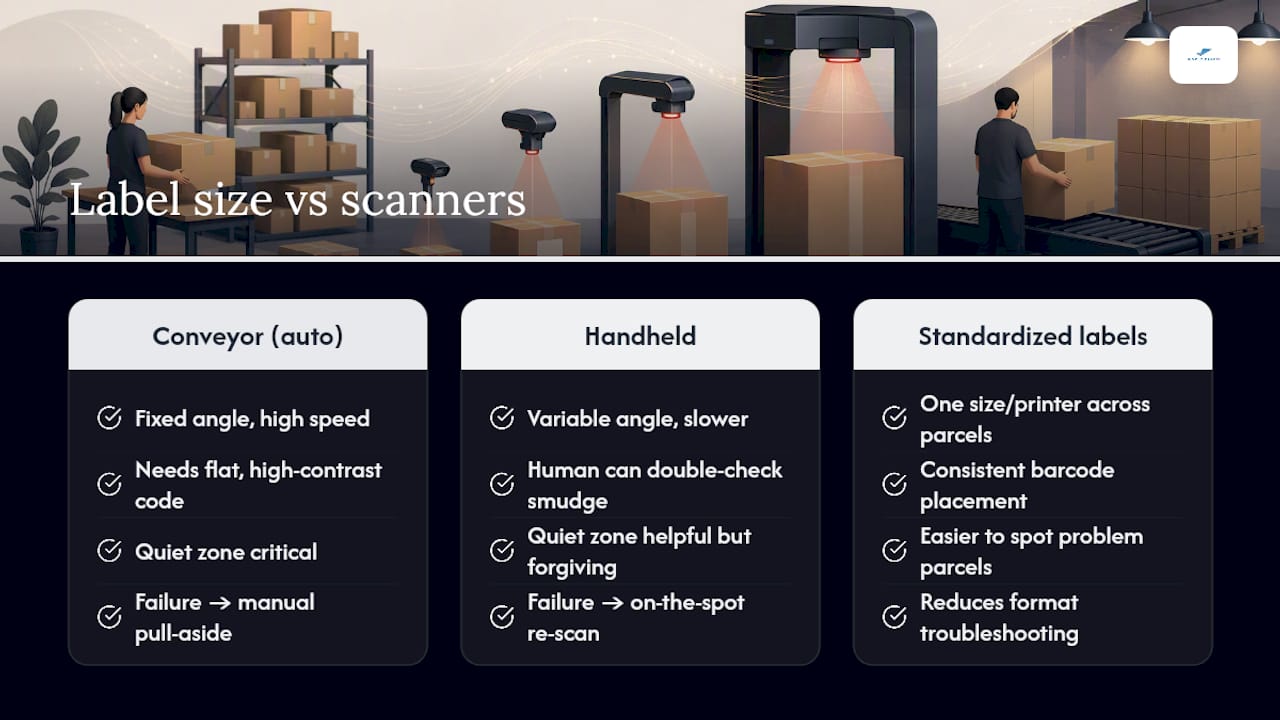
Automated sorting facilities lean even harder on this than a courier with a handheld scanner. Conveyor-belt scanners often read barcodes at speed and at a fixed angle, with no human double-checking a smudged code before moving the parcel along. That's precisely the setup where a flat, high-contrast barcode with an unobstructed quiet zone makes the difference between an automatic sort and a manual pull-aside for re-labeling, which slows your parcel down.
This is also where label size interacts with tracking accuracy in a way many shippers don't anticipate. If a barcode fails a scan at one checkpoint, some systems log a tracking gap rather than an error, leaving you looking at a shipment that appears to have "disappeared" for a day when it was actually just sorted manually and re-scanned later. Correct label sizing and placement is one of the simplest ways to keep your tracking history free of those confusing gaps.
Bulk shippers running multiple parcels through the same account benefit even more from consistency. Standardizing on one label size and printer setup across every shipment makes it far easier to spot which parcels are prone to scan issues, rather than troubleshooting a new format every time.
Tools and Templates for Creating Shipping Labels
Most people don't need dedicated design software to produce a correctly sized shipping label. The shipping platform you book through typically generates the label automatically once you enter package details, and you simply choose your output format (4×6 for thermal, A4/Letter for inkjet or laser).
For businesses that need more control, a few practical options exist:
- Template libraries from label manufacturers offer pre-formatted 4×6, 2×4, and A4 layouts sized to match popular label stock, which is useful if you're designing labels outside a shipping platform entirely.
- Spreadsheet-based batch printing works well for small businesses shipping the same handful of package types repeatedly, since you can set up a template once and reuse it.
- Booking platform exports, like the PDFs or PNGs generated through your shipping account, remain the most reliable option because they're already formatted to match what your chosen carrier expects.
If you want to see what finished labels actually look like across formats before committing to a printer setup, our guide to shipping label templates breaks down the common types side by side. Pairing the right label size with solid packaging habits, covered in our parcel packaging guide, does more to prevent scan failures than any software choice alone.
Ready to book a shipment and skip the label-sizing guesswork entirely? Get an instant shipping quote through Simplyparcel, and the platform generates a carrier-ready label in the correct format for your printer automatically.
Our Take: The Real Skill Isn't Picking a Size, It's Matching One
Most advice on this topic treats label size like a trivia question with one correct answer. It isn't. The 4×6 standard is real and worth defaulting to, but the more useful skill is matching label stock to the printer you already own and the package sitting in front of you, rather than hunting for a universal "right" number.
Where conventional guidance falls short is in treating dimension as the whole story. A perfectly sized 4×6 label with a scaled-down, blurry barcode fails just as often as a label that's the wrong size entirely. The barcode's readability, not the ruler measurement, is what a scanner actually cares about.
If you take one thing from this guide, prioritize the printer settings over the label purchase. Buying the "correct" label stock and then printing it at "fit to page" defeats the purpose.
— Simply
Sources
- Shipping label sizes — standard shipping label sizes
- Shipping label sizes | ParcelToolkit
- Choosing the right label size for shipping and inventory | Blanco Labels